It also looks at how you can move a gadget around in your blog, and describes what you can do with some of Blogger's most-popular gadgets.
Gadgets and types of Blogger template

Previously, I've explained could you repeat that? Gadgets (ie widget) are, and the advantages and disadvantages of both method of count single to your blog, and how to add a doohickey to a blog with a dynamic-view stencil.
This artile looks by the side of the details of using Blogger's own add-a-gadget tool, how exactly to service it, and how to amend the placement of gadgets in your blog.
This is more in-depth than the dynamic templates article, and applies primarily to blogs with blueprint and designer templates. The same wide-ranging line of attack is used in support of dynamic stencil blogs, but they act allow a little skin texture so as to aren't discussed at this point (eg a imperfect range of gadgets so as to truly work).
In-post, and HTML-code gadget:
The tool described at this point lets you deposit a doohickey in one of the "gadget areas" in your blog. The options are a little another if you care for to deposit a doohickey straight inside a blog-post.Also, nearby are reasons why you might like better to progress the HTML-code in support of a doohickey, and install it like you install one other code to your blog. Read more almost the reasons in support of using HTML-gadgets and spaces to progress code that's equivalent to Blogger's formal gadgets.
How to use Blogger's Add-a-gadget feature
In post-Sept-2011-Blogger (ie the new UI): go to the Layout tabOR
In pre-Sept-2011-Blogger (ie the old UI): go to the Design > Page elements tab
The Add a Gadget relations on the screen shows you all the spaces so as to you can at present add a doohickey. Choose which place to add single to to.
(You can turn into it doable to add gadgets to other spaces comprehend How to add a doohickey beyond your heading, or Adding a new-fangled footer section to your stencil in support of ideas on how to act this.)
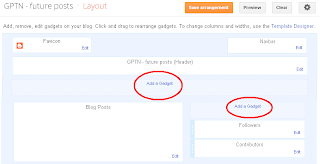
Click the Add a gadget link at the top of the area you choose.

I suspect it's not quite finished yet, so the it may look a little different to what's shown in this picture.
But the main contents should be the same.
Choose a gadget from the list, or one of the tabs:
- You may need to scroll down the list to find the one you need.
- Do not use the search tool in the list to find the gadget that you want - it sometimes doesn't work correctly and only shows gadget from 3rd parties and not the official ones from Blogger.
- Every gadget in the list has a source: some are from Blogger.com. Some are from other recognised companies (eg Amazon.com), But some are from individuals, just like you and me. The danger with using a 3rd party gadget from this list is that you have no way of looking at the code behind it, so you cannot decide if it's safe or not.
I recommend only choosing gadgets from Blogger.com, or other well known companies.
 beside the name.
This opens the gadget configuration screen, where you enter the details of how you want the gadget to work.
Every gadget needs different details.
For example, in the Popular Posts gadget, you must choose
- to list popular posts since statistics started, or the last 7 or 30 days
- whether to show the image thumbnail
- whether to show the post snippet
- how many posts to show
When you have entered the parameters, click Save.
This takes you back to the blog-layout screen. The new-fangled doohickey is by the side of the top of the register of gadgets in the area anywhere you deposit it. If you gave it a title, afterward this will be evidence for up. But if you gone the title vacant, the screen precisely shows the doohickey type.

Use the Preview button to see what the front page of your blog will look like with the gadget added.
Change the position of the gadget if you want to (see the next section if you need help with this).
Once you are happy with the gadget and its position, click Save to apply it to your blog.
How to change the position of a gadget:
You can move a gadget (new or existing) into any place in your blog-layout that you can add a gadget to. In the Layout (Design > Page elements) screen:- Single-click on the gadget and hold the mouse button down. Keep holding it down.
- Dragging the mouse moves the gadget to other places, including further down the list of gadgets currently in that space, or into a totally different part of the blog.
- Once the gadget is in the place where you want it to be, let go of the mouse-button.
Once you are happy with the position of all the gadget, click Save (in the old Blogger) or Save arrangement (new Blogger) to apply the new places to your blog.
There are other things that you can do with gadget, too, including only show them on the Home-page, and making a gadget that looks like a post.
What can Blogger's gadgets be used for
Some of the most popular gadgets provided by Blogger are:| Labels | Lets your readers pick a category and see a list of posts from your blog with that category. |
| Popular posts | Shows the most-frequently read posts from your blog |
| Pages | Similar to Labels and the linked-list gadget, this one can show a list of either Pages from your blog or external sources, and it can also be used to make a menu bar for your blog |
| Blogroll | Highlights other blogs that you follow |
| Picture | Shows a picture, of your choice, which can link to somewhere as well. |
| RSS | Displays the last few posts from an RSS feed - this can be any feed that you choose - not just your own one. |
| HTML/Javascript | Lets you add code that came from a 3rd party, or that you wrote yourself, without having to edit your template. |
| Link List | A general-purpose gadget for adding a list of web-sites and blog pages, either inside or outside your blog. |
No comments:
Post a Comment